
 Tagify is a blog focusing on all aspects of the internet. You`ll find tutorials here on Adobe Flash and Blogging, tips, tricks, and design news. It`s the only site that reworks the web.


NOTE: This is a direct source copy from my old tutorial that got removed as my hosting expired. However, thanks to Google, I got a cached version, and I present to you this tutorial. It was written a while ago, but it's great for beginners. This is written in AS2 and is good if you want a easily upgradeable game running in minutes. There was 53 comments in the this post before, but I removed them to save space.. If you enjoyed this article, please comment or suscribe to my RSS feed. Over and out!
Adobe Flash CS3- Game tutorial Tagify Actionscript 2
Tagify
Rework the web-Tutorials, Flash, Blogging
May 5th, 2008 by Blanked
Reposted April 12, 2009 by BlankedT
Hello! Welcome to my first ever guide on my website, and today we will be focusing on one of Adobe’s greatest programs for graphical entertainment- Flash CS3. I understand that not every one of you have the CS3 version of this program (Creative Suite Three), but I am pretty sure this will work for many different types of Flash. Since I am using Action Script 2.0, any version that has it can be used. Beyond that, let’s get started! Remember, if you have questions, do not hesitate to ask! I also recommend you look over the script and type it out yourself, because you’ll learn way more that way. Of course, I’ll also include what the actionscript means- to the best of my ablity. I am no expert in Flash! Today, we will be studying a topic a little more indepth than the regular tutorials. To complete this tutorial with the least struggle, I recommend you know the following- 
 Okay, you can play around with your creation now. Like it? Probably not. It’s too simple. Let’s continue on. Right now, you can add animation, etc- but I recommend not to yet. If you know how, go ahead. But it isn’t very important at all. Let’s make ‘walls’ for out object so he can’t go off the screen. You can also use this technique as real walls, so it’s a maze. Draw an object, using the rectangle tool, shortcut ‘R’. Make it thin, and position them just along the edge of your stage (the white part). Add it on all sides, so it makes a block of your screen. In this example, I just a stroke colour of black so you can see where the blocks are located. The menu I popped out and the area beside the alpha option is how to turn stroke on or off. On the other hand, this is the pencil colour menu as well.
 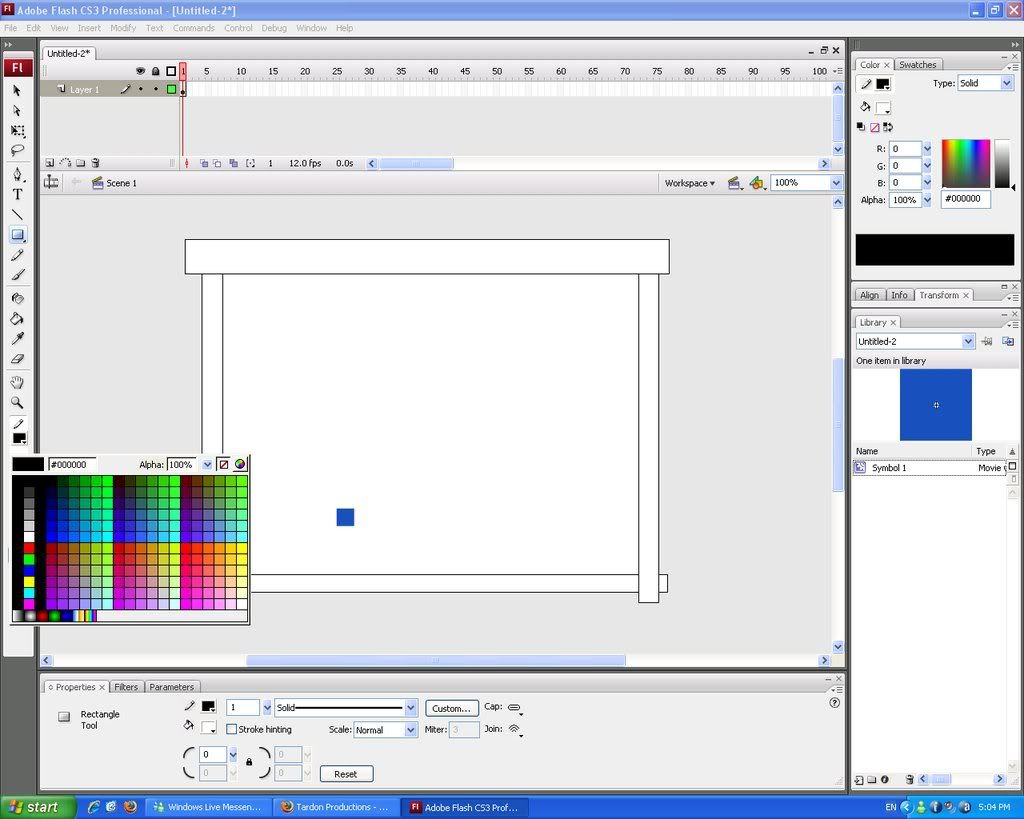 If you test your movie now, the blocks will basically not do anything. How are you going to fix it? First, exit your movie preview if you are, then click on the right block. Right, for those who don’t know is this way —>. Select it, and it only, then F8, or right click>convert to symbol… and select movie clip again, registration point middle as well. Name it anything, but try to make it so you know what it is, such as ‘wall_right’. Now do this for the left <— one, as well as the top and bottom columns you made. In total, you should have four seperate walls, columns, whatever. To make these walls work, you’ll first need instance names. Select your square movieclip, which should be the one that can move in all directions. Now look toward the bottom. See the empty box below ‘Movie Clip’? If you haven’t editted it, it should say <Instance Name>.Click on this, then add ‘man’.
 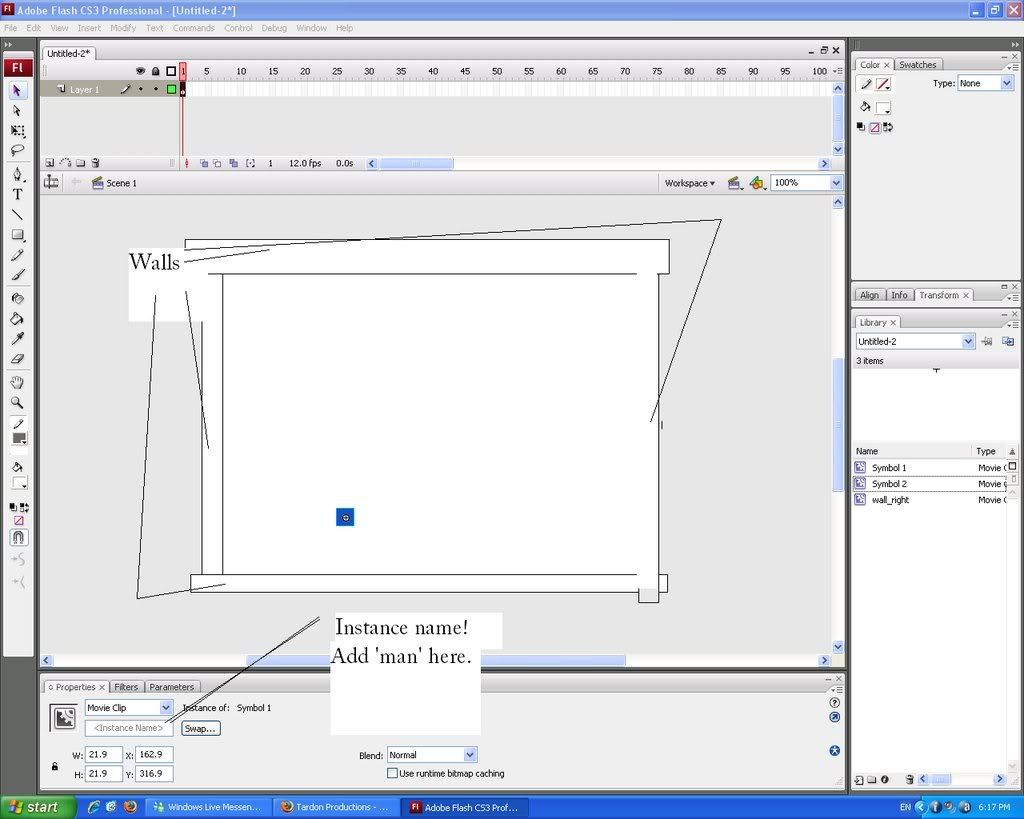 http://i169.photobucket.com/albums/u212/maholain/untitled.jpg Great! Now click on your right wall, and press F9, on right click>actions. Enter in this code-
 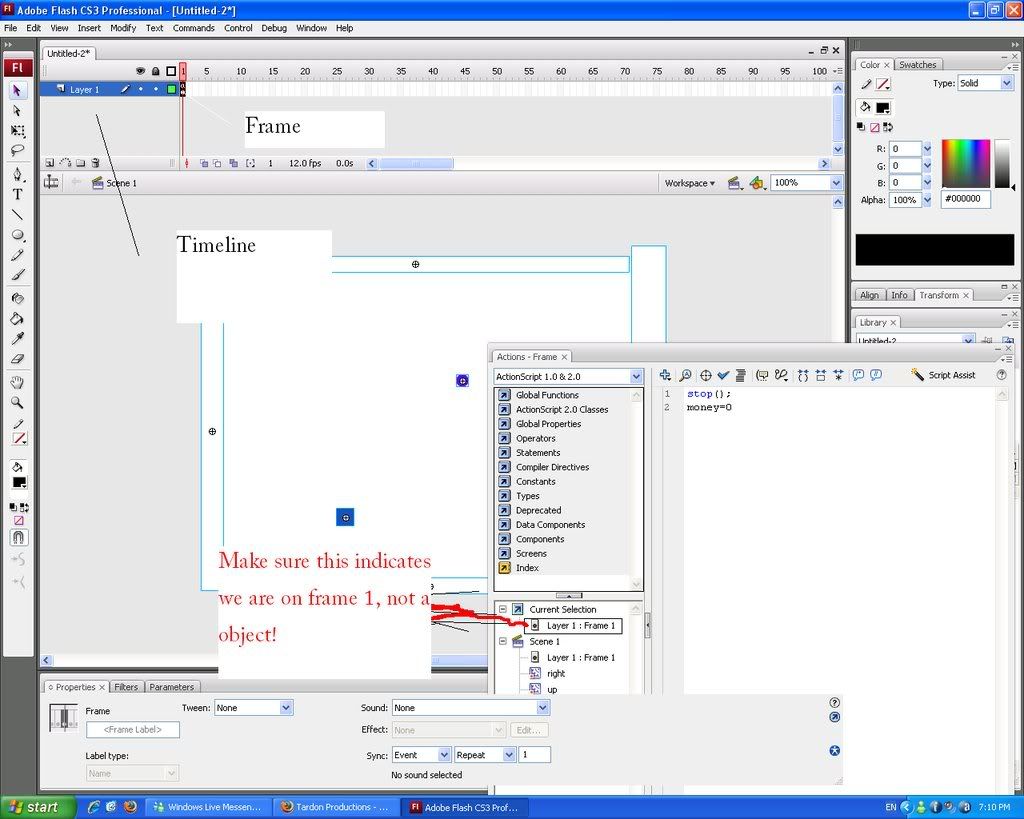 http://i169.photobucket.com/albums/u212/maholain/1.jpg Done? Great. Now add this code to the Frame 1:
 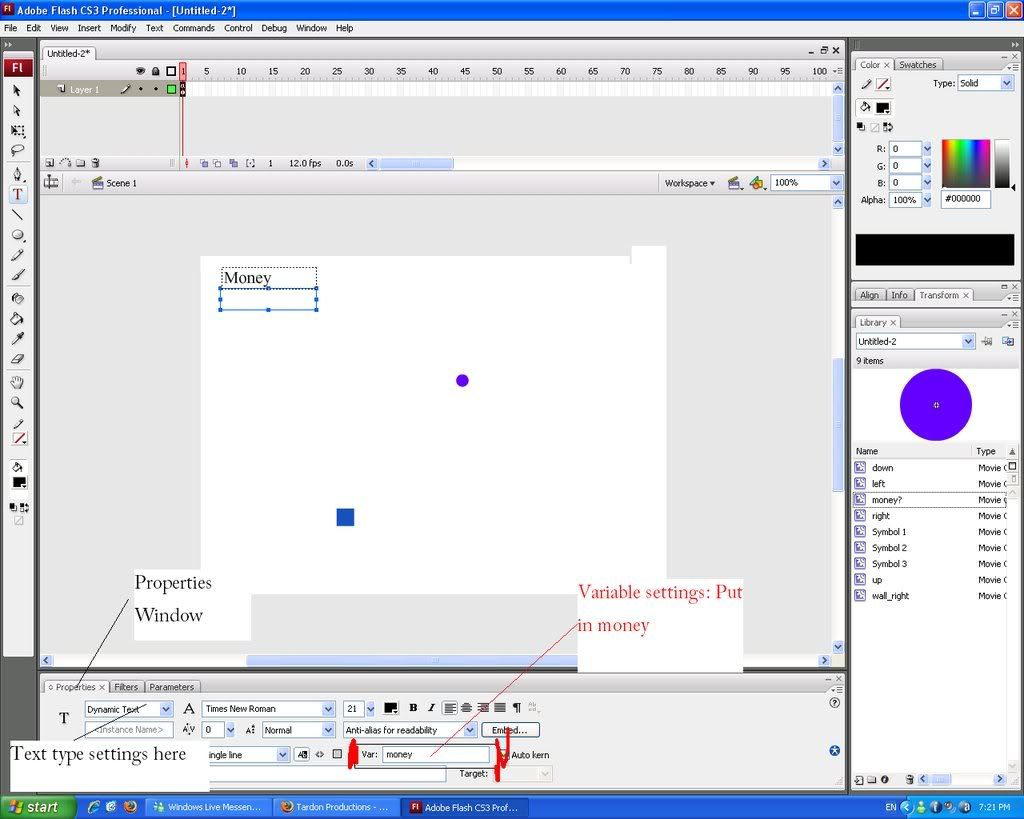 http://i169.photobucket.com/albums/u212/maholain/2.jpg If you look at the above image, I also added a static text box with the words ‘Money’ above my dynamic one. Totally optional. Good for letting people know however. Don’t panic if you don’t have that purple dot on the screen. I added it there ahead of time, to experiment. But now it’s your turn- select the oval tool, which is hidden with the rectangle tool (press and hold the rectangle icon in the tool bar to bring out all the options of the shapes) or press ‘o’ on your keyboard. I’m going to tell you now, if you ever see this ‘)’ when I tell you to press a shortcut key, it’s usually either zero or ‘o’. That letter. That makes the ‘ohhhhhhhhhhhhhhhhhhhhhh’ sound? Yep. Draw a little circle, like a coin. Decorate it if you want. You can add a stroke as well. Make it unique, unlike my purple circle *cries*. But purple’s cool, me right? Thumbs up! Wow, so much for off topic. Probably been typing for too long. You know the drill now. Select the object, and turn it into a symbol. You forget how? Oh noes! Press F8, or right click> conver to symbol… Oh darn, I’m too lazy to press SHIFT for capitals now! Mkay… since you should know how to add instance names now, like you did and added one to our square to make it ‘man’… Do the same thing but add ‘money1′ instead of man to that purple circle I have. Open up the actions window (Let’s not explain again, just Ctrl+F on this piece of writing too find an explaination…) and add…
- Basic Skills, such as drawing objects
- Making Movie Clips/Buttons/Symbols (Though this wil be explained)
- It would be nice if you had some experience with Action Script, even if it is [stop();]
NOTE: I have realized that images are all scrunched up on my blog. I will post the direct image links so you can click on them to view a full sized image.This is what you’ll be making: Basics first- open Flash. I am using CS3 version, but other versions will be similar. Then, create a new Flash Document- File>New>Select ActionScript 2.0. Click okay.
NOTE: When I use the ‘>’ sign, it means it is a sub-menu of the actual item: Like when you look at the top of the menu, you will see File Edit Commands.. and so on. If you click File, then it will open up it’s own sub-menu. Then Click on New (Ctrl+N), which opens up the ‘New Document’ window. Select Flash File (actionscript 2.0).After you are done this, a new blank page should appear. In some versions, I have noticed, it will ask for the page size, etc, first. Just leave it default. So now you are staring at a blank screen. What now? My document size is 550 (width) x 400 (height) in pixels. The size of this screen doesn’t matter much, but just make it big enough so it looks decent.
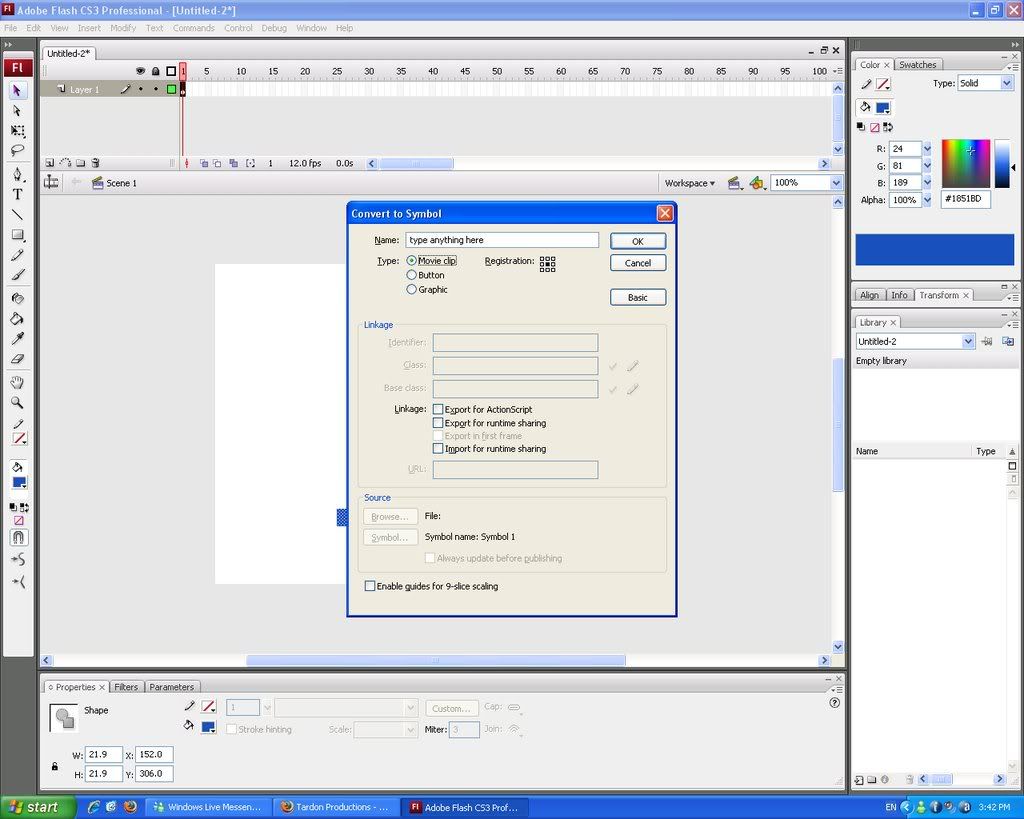
http://i169.photobucket.com/albums/u212/maholain/desktop.jpgCheck the above image. Does it look at all like yours? My version is CS3, so it will be different- what you want to see at least is a blank canvas waiting for you to edit it on. Select the ‘Rectangle Tool’ now. Looking at my above image, it is the 8th icon down, just two away from the text tool. If you can’t see it, it is most likely you still have the ‘Oval Tool’- to change it, simply press the shortcut key ‘R’. You SHOULD have it now. Grab a fill colour, any you want. I chose a dark blue. To change fill colour, just edit the colour option by clicking the icon that has a bucket on top of it, with a colour below. Click that colour and choose one. Now we are going to remove the stroke colour as well. Just above the background colour object (described above), is a pencil and yet another colour box below it. Click on it and select the icon (usually located top right) that looks like a white box with a red slash across it. This prevents our object to have a border. This step is not necessary, just a little bit nicer, so don’t panic at all if you miss this step. It’s time to draw our guy. It can be any shape you want- mine is personally a squar-ish object. Hold down SHIFT if you want it to be a perfect one. If you want yours to be the same as mine, here are some stats of my object:
- Colour- #0033FF
- Width- 21.9
- Height- 21.9
- X location- 152.0
- Y location- 306.0
http://i169.photobucket.com/albums/u212/maholain/actions.jpg
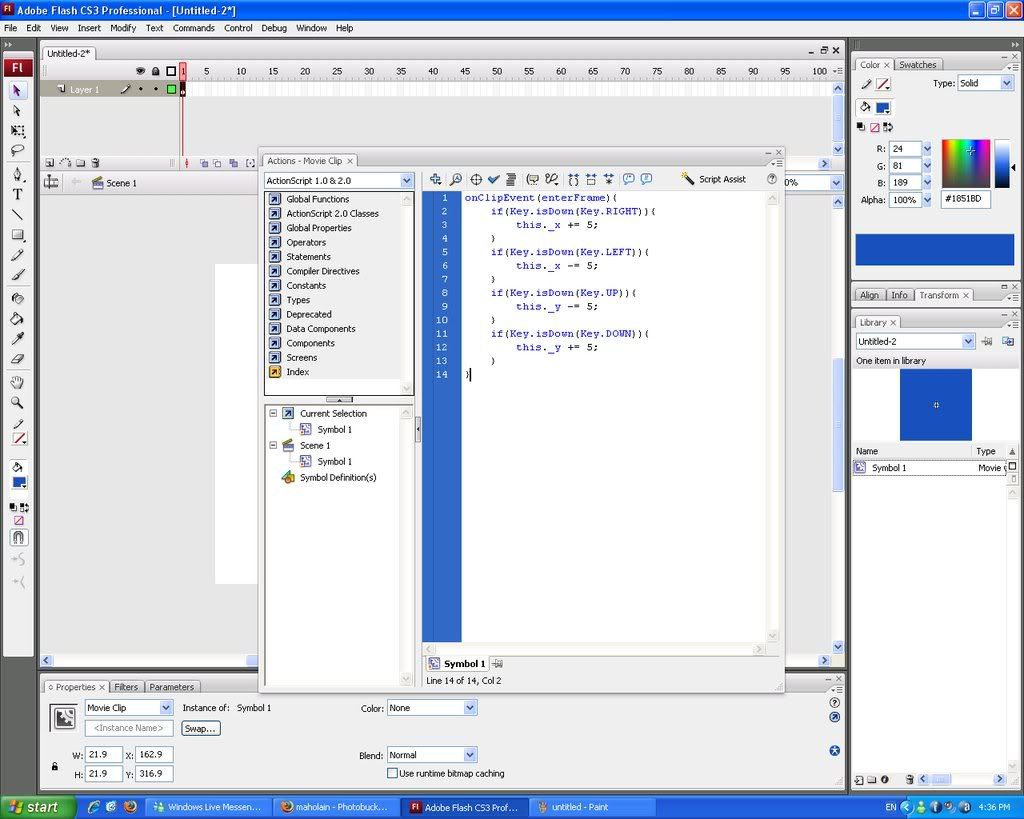
Note: If you want to use your own image, instead of drawing it, go to File>Import> Import to stage. Shortcut key of Ctrl+R. You will still have to convert it to a movie clip, etc.What we just did- converting it to a symbol- is how you are going make movie clips, etc, and was one of the skills I recommend you have on my check list (see the third option). If you test your movie (Ctrl+Enter), you’ll see your static square. If Control+Enter doesn’t work, try Control in the menu (File, Edit, etc) and then select ‘Test Movie’. Okay, okay. I know you want your guy to MOVE now. Jeez, I’ve wasted so much time! Most of you already know how to make movieclips- but here is some four directional movement. Make sure you character is selected. If you forgotten how to, click the object you just created, and it should have a little box with a crosshair surrounded by a circle on it, which is the registration point. Now press F9, or right click the object, and select actions. Add this code in, word for word, with the spaces, etc-
onClipEvent(enterFrame){ if(Key.isDown(Key.RIGHT)){ this._x += 5; } if(Key.isDown(Key.LEFT)){ this._x -= 5; } if(Key.isDown(Key.UP)){ this._y -= 5; } if(Key.isDown(Key.DOWN)){ this._y += 5; } }You can exit the box now. Test your move again. Control+Enter or Control>Test Movie. Use the arrow keys to move. You should be able to go in all directions. Here is a screenshot for you:
Okay, you can play around with your creation now. Like it? Probably not. It’s too simple. Let’s continue on. Right now, you can add animation, etc- but I recommend not to yet. If you know how, go ahead. But it isn’t very important at all. Let’s make ‘walls’ for out object so he can’t go off the screen. You can also use this technique as real walls, so it’s a maze. Draw an object, using the rectangle tool, shortcut ‘R’. Make it thin, and position them just along the edge of your stage (the white part). Add it on all sides, so it makes a block of your screen. In this example, I just a stroke colour of black so you can see where the blocks are located. The menu I popped out and the area beside the alpha option is how to turn stroke on or off. On the other hand, this is the pencil colour menu as well. If you test your movie now, the blocks will basically not do anything. How are you going to fix it? First, exit your movie preview if you are, then click on the right block. Right, for those who don’t know is this way —>. Select it, and it only, then F8, or right click>convert to symbol… and select movie clip again, registration point middle as well. Name it anything, but try to make it so you know what it is, such as ‘wall_right’. Now do this for the left <— one, as well as the top and bottom columns you made. In total, you should have four seperate walls, columns, whatever. To make these walls work, you’ll first need instance names. Select your square movieclip, which should be the one that can move in all directions. Now look toward the bottom. See the empty box below ‘Movie Clip’? If you haven’t editted it, it should say <Instance Name>.Click on this, then add ‘man’. http://i169.photobucket.com/albums/u212/maholain/untitled.jpg Great! Now click on your right wall, and press F9, on right click>actions. Enter in this code- onClipEvent(enterFrame){ if(this.hitTest(_root.man)){ _root.man._x -= 5; } }So we are introduced to hit Tests. Basically, here is the script explaination- onClipEvent(enterFrame){——- This makes the computer ‘watch’ these events after ‘{’ continously if(this.hitTest(_root.man)){—– Computer checks ‘if’ a hit Test is made with ‘man’. That is why we needed a instance name. _root.man._x -= 5;————– So if’ there is a hitTest (basically, a hitTest is if they are touching each other), then man will move on the x scale - 5, aka, oppisite direction, so he will not move at all. The counter each other to equal 0. The ‘}’ just close the statement. With this code, you should be able to do it to every wall- when you look at the character’s action, say UP, you see ‘this._y -= 5;’. So on your top wall, you’d add the ‘onClipEvent(enterFrame){ if(this.hitTest(_root.man)){’ but instead of ‘
onClipEvent(enterFrame){ if(this.hitTest(_root.man)){ _root.man._x -= 5; } }You;d change ‘_root.man._x -= 5;’ to ‘_root.man._y += 5′, since it is the oppisite of up. Note the change of both the X/Y axis, and the ‘+’ and ‘-’ signs. Yup, math! Okay, if that doesn’t work, just add these codes- they are presented in this order- UP, LEFT, and then DOWN. Add these in the respective border, column, whatever.
onClipEvent(enterFrame){ if(this.hitTest(_root.man)){ _root.man._y += 5; } }
onClipEvent(enterFrame){ if(this.hitTest(_root.man)){ _root.man._x += 5; } }
onClipEvent(enterFrame){ if(this.hitTest(_root.man)){ _root.man._y -= 5; } }Mkay! Test your movie now! You may notice that you guy seems to go ‘under’ the column, even though he can’t pass it. He may seem like he bounces back as well. All you have to do is right click your ‘man’ or square movie clip, then go to arrange>bring to front. It should solve the problem. Depending on when you do it, it might be safe to bring it to the front more than once. This should be the end result- Click on it to focus it so you can move. Since it is a little small, refer to the actual size here- http://www.instantimagehosting.com/storage/Untitled-2_1.swf If you got this far, congratulations! It must mean my tutorials are okay! Or you are really smart ;). I’d choose the latter, but oh well. Good job once again! Now it’s time to touch up some things- maybe add lines or some kind of indicator where the walls are. Put some colour or design in it. Anything can spice it up. Like before, add any creative touches you want. Done? Good! Okay, you can probably get most of that in many tutorials. Here’s a less known one- getting items. We will explore this in the easiest method first- getting money that will add to a dynamic text box. First, let’s find a way to get money that will add to a counter- a dynamic text box- as we touch it. Then, the movie clip (money) will be removed, so we can’t get it again. Go to the timeline, with your frames and layers. Select frame 1, which you should be working on, and right click it and select actions. F9 works as well. You’ll enter to a familiar box where you can input code- but check to make sure you are on Frame 1. Refer to the image below.
http://i169.photobucket.com/albums/u212/maholain/1.jpg Done? Great. Now add this code to the Frame 1: stop(); //the frame will not move along the avaliable frames unless a command tells it to money=0 // We will create a text box with a variable called money later. This tells the computer that this textbox should default display the digits ‘0′Don’t be afraid to copy and paste the whole thing- you may notice that the text after ‘//’ is not code. But in ActionScript, the ‘//’ symbol can allow someone to add comments. In this case, I am describing the script. Now, let’s create a dynamic text box. Select the text tool, which should have some kind of ‘T’ on it. Shortcut key: ‘T’. Drag and release to create a text box; but it won’t be dynamic unless you make it. In the ‘properties’ window, when you select your text box, it will have a drop down box that may say ’static text’ right now. Change it to ‘Dynamic Text’. There, you made dynamic text. Now, in the same properties window, there should be an empty box waiting for input called ‘Var:’. No, this isn’t the instance name spot! Once you find it, add ‘money’ without the ‘ and ‘. If you play your movie now, your text box should be displaying 0. It won’t change as nothing is making it to, but that will be solved soon. Refer to this image below if you can’t find the var, properties, etc place:
http://i169.photobucket.com/albums/u212/maholain/2.jpg If you look at the above image, I also added a static text box with the words ‘Money’ above my dynamic one. Totally optional. Good for letting people know however. Don’t panic if you don’t have that purple dot on the screen. I added it there ahead of time, to experiment. But now it’s your turn- select the oval tool, which is hidden with the rectangle tool (press and hold the rectangle icon in the tool bar to bring out all the options of the shapes) or press ‘o’ on your keyboard. I’m going to tell you now, if you ever see this ‘)’ when I tell you to press a shortcut key, it’s usually either zero or ‘o’. That letter. That makes the ‘ohhhhhhhhhhhhhhhhhhhhhh’ sound? Yep. Draw a little circle, like a coin. Decorate it if you want. You can add a stroke as well. Make it unique, unlike my purple circle *cries*. But purple’s cool, me right? Thumbs up! Wow, so much for off topic. Probably been typing for too long. You know the drill now. Select the object, and turn it into a symbol. You forget how? Oh noes! Press F8, or right click> conver to symbol… Oh darn, I’m too lazy to press SHIFT for capitals now! Mkay… since you should know how to add instance names now, like you did and added one to our square to make it ‘man’… Do the same thing but add ‘money1′ instead of man to that purple circle I have. Open up the actions window (Let’s not explain again, just Ctrl+F on this piece of writing too find an explaination…) and add… onClipEvent (enterFrame) {//already explained, tells the computer to constanly check for actions on this object… if (this.hitTest(_root.man)) {//explained as well, checks ‘if’ there is a hitTest with man, our square _root.money += 100;//remember how you added a similar code to our frame 1? This increases the digits from 0 to 100. Clever, huh? }// ends a statement if (hitTest(_root.man) == true) {//checks for a hitTest with man again, and if it is true… unloadMovie(_root.money1);//removes the movie clip with an instance name of money1, which should be the one we add this code to }//statement end }//statement end againNow test your movie! Control+Enter, or Control>Test Movie if your forget. When you move over ‘money1′, the circle’s instance name, it should add to your dynamic text box with the variable of ‘money’ from the default 0 to 100! If you don’t want people to get that, or get less, just change the 100 in ‘root.money += 100;’ in the above code to whatever, like 1, or 1000000000000000000000000000. Just had to take up some room! =] Wow, it’s actually looking like a game. A-mai-zing. Let’s move on. As promised, we’ll also cover the part where you can talk to NPC’s if you are close enough to them! It isn’t very hard actually… Create another movieclip, and this will be your NPC that you can talk to. I hope you know how to create one now! This part will get a little confusing, so I will provide a check list later of the things you should have. Make another MC now, let’s say that it should COVER (yes, cover) the entire NPC that you just made, plus more. Don’t worry, I know it looks bad for now. After you converted this to a Movie Clip, go to the properties window, and at colour, which should say ‘none’ for now, and change it to Alpha. Beside it, a new drop box will pop up. It might be set to 100%- change it to 0%. Now you can’t see that ugly box you made. Wee! CHECK LIST TIME! You should have:
- A NPC
- A invisible box, with alpha setting at 0%, right ONTOP of the NPC
onClipEvent(enterFrame){ if(_root.man.hitTest(this)){ _root.npc.gotoAndStop(2); }else{ _root.npc.gotoAndStop(1); } }I know some of it is not necessary, but I have no time to trim it right now (This is part of a game I was working on). (I’ve updated the script, so the crossed out does not apply anymore!) Does it work now? Make sure your ‘npc’ has two frames with ’stop();’ commands on both. Then, make sure your invisible box has the above code. Your player must have an instance name of man. Test your movie. It should work! If it doesn’t, check to make sure the NPC has an instance name of ‘npc’: remember, it’s case-sensitive. It can’t be ‘NPC’. Or ‘NpC’. Or whatever, techno, geeky style you got. Just kidding. Do you have something like this now? http://www.instantimagehosting.com/storage/Untitled-2_2.swf Remeber, click somewhere in the Flash movie to focus it to move! That weird stick-block figure is my NPC, not my main character =]. Great! We’ve gotten a lot done. Reward yourself with ice cream or something. You are going to learn even more soon… This is the part you’ve ALWAYS been waiting for most likely. It is generally the hardest part to find in any tutorial. This time, we are going to study HP bars. Follow these instructions closely please! It isn’t too hard, but one mistake and it will totally fail. Like making your character and a NPC, make an enemy. Then, turn it into a movie clip like we’ve done so long. For a simple recap of stats, make sure the type is Movie Clip, and the registration should be set to the centre. Give this enemy an instance name of enemy. Scroll up for a recap on how to do so if you forget! Add this code into the actions panel of ‘enemy’
onClipEvent(enterFrame){//explained, look at examples before{ if(this.hitTest(_root.man))//explained, look at examples before{ _root.hpBar -= (random(2)+1);//the text box of ‘hp’ which we are going to make will be subtracted randomly, anywhere from 0-2, and an extra 1, so max damage is 1, but minimally, at least 1. }Now create another dynamic text box. I’m not going to drill again and again on these processes; just remember the handy Control+F function. Give it a variable of hpBar. Remeber to include the capitals! Then, create your actual Hp bar. A red rectangle works fine. Surprise, surprise, convert it to a movie clip again. MAKE SURE THE REGISTRATION POINT IS IN THE CENTER LEFT. Like: - - - *- - - - - The star represents the place where the registration point should me in the 3×3 registration grid. (Credits to Nicau for point this out!) Give it an instance name of ‘hpgauge’. Remember how we added code into Frame 1 for our dynamic text box for money? We will do the same for the hpBar text box as well.
_root.hpBar = 100;This basically sets our base text as 100. Change it if you like. Make sure that this code is entered in FRAME ONE, not the text box with var: hpBar; or the red hp bar for that matter. Now enter this code in your red hp bar:
onClipEvent(enterFrame){ this._xscale = _root.hpBar; if(_root.hpBar < 0){ _root.hpBar = 0; _root.gotoAndPlay(2) } }The code is a little more complex here, but it isn’t too hard. Basically, it makes the computer shrink the HP bar according to the percent HP you have left. Test your movie now? Is it working? You might have to right click your character again and select arrange>bring to front so your enemy won’t overlap your character. Now let’s make a lose screen. On the main timeline, create a frame by right clicking frame 2, and this time, select ‘Insert Blank Keyframe’. This will lead you to a blank screen where you can draw you lose, you suck!, or whatever. Make sure you go into Frame 2’s actions- right click Frame 2>actions, and put in
stop();This won’t make the movie play over this unless needed. Once your HP hits 0, you should go to frame 2, since we already inputted the code. Didn’t notice? Here:
onClipEvent(enterFrame){ this._xscale = _root.hpBar; if(_root.hpBar < 0){ _root.hpBar = 0; _root.gotoAndPlay(2)// this makes it go to frame 2. The number 2 in this statement, (2), is the frame number. } }Test it again. It should work, right? Here is another example: I know it is very fast paced, because I set the frame rate at 120 fps. I’ll teach you that another time. You probably already know though- it is excellent when testing games and not wanting to waste time waiting to die. Bad for players though. And sorry for the lose screen- had some fun with the language there *cough*. You must refresh the page to try again, because there is no back btton yet. Or you could right click my flash movie and select ‘rewind’. Works like a charm. Wow… we covered many things. Checklist again:
- Making objects
- Converting them into Movie Clips
- Adding actions
- Creating walls with help of hitTests
- NPC interactiveness
- Money pickup
- Dynamic text box lesson
- Hp bar
- Enemies
_root.clock+=1;Then, return to the main timeline (double-click anywhere else to go back) and right click Frame 1, and selecting actions. Now, on frame 1, add in this code:
clock= 0And it should work. If your clock starts AT number one, change it so it looks like:
clock=-1Use negative signs people! Great. You can do a lot with your knowledge here for sure, if you take it with you wisely. If you want, copy the dynamic text box with the var: of clock (Right Click>Copy, or Control+C), and go to frame 2, your lose screen. Paste in your text box anywhere. When you go to this lose screen, it will show how long you have played. Might want to add with a static text box the words ‘Time’ as well, so players are informed. Custom cursor is a snap to make. It basically masks over your current cursor and follows it. Draw a cursor, but don’t make it too big- try to make the edge sharp like you would see with a standard cursor. Convert this to a movie clip as well, but CAUTION:
The registration point of the cursor MUST be set to the very top left. So it would be the top dot on the last column to the left. It must be for it to function as a real cursor.Now, open the actions screen for the cursor movie clip. Add this code:
onClipEvent(enterFrame){//computer checks frames for differences Mouse.hide();//hides Mouse startDrag(this,true);//starts the drag of this item }//end scriptThere we go! Now my final promise was a back button. Add one to your lose screen. Create some sort of button, a rectangle, etc, and convert it to a symbol as well (F8).. but for type, select Button. Change the registration point back to the middle. Open the actions menu for this (F9), just as you would for a movie clip. Add in this code:
on(release){// when the mouse is released gotoAndPlay(1)// go to and play frame 1 }// end scriptOh yeah, make sure you copy the cursor you made on frame 1 to frame 2, or else you won’t have it! And, right click the cursor item, select Arrange>Bring to Front. Or else the button will completely hide it. If you want make your button a little bit more entertaining and visually inspiring, view other tutorials on buttons… or wait for mine! =] If it ever comes of course. I’m a bit tired after this one. This concludes my tutorial! I hope you have learned a lot from it- and that you can use these simple codes and turn them into more advance things. Ideas include:
- Making a portal that directs you to a win screen if you touch it
- An instructions screen, using frame and button knowledge
- And much more!
Subscribe to my feed
Good to see a tutorial but I have some suggestions.
Don't use those lines or white box's to point at the objects in your pics. Choose something like a large red arrow that will stand out and not confuse the person trying to learn. You have a shitton of scribbled lines running all over the place.
Get to the point, nice to see your social flare but it's unnecessary and hinders the learning process. Just be logical... step 1-0... step 1-1 step 1-2 etc.
Organize this into a more cohesive teaching tool. What you have here looks like a garbled mess.
wow your verry smart and it helped
but for other you can put it into a video :p
sorry he
its verry long
Nice! thank you for this.
Could be a little easier to read but I got through it. Thanks again.
No problem. This was written a LONG time ago, so sorry...
Maybe you could make a new one???
This is a very good tutorial at all. But I think you wrote a bit too much of your thoughts at all. I got through it too... It helped me alot. Thanks.
Thank you very much
Also i descovered that if you want some kind of guard to repel you, you can use the wall script on him/her of the way they face. you will be pushed infront of them. It works well with speaking eg. "Get outta my way!"
How do you make them attack?
Please post an artical on this.
ahhhhhhhg it says u cant add an action to it!!!!!!!!
the money and enemy scripts didn't work!!!
I have Flash6.
I'm having the same problem with the coins. can you add the pure script without all the comments?
anonymous put this code in the coins
onClipEvent (enterFrame) {
if (this.hitTest(_root.man)) {
_root.money += 100;}
if (hitTest(_root.man) == true) {
unloadMovie(_root.money1);
}
}
put money=0 into the frame
I understand that you did this a while ago but you should of proof read it because to a beginer this is usless. First off when explaining something don't start rambling on something off topic which you did in every paragraph. Second when giving code display it like this:
if(some code)//then some comments
if(some code)//then some more comments
unlike what you did which just caused headachs trying to pick out the bits that were code.
all and all I voted this tutorial poorlly because although it demonstrated a good movement code that worked the rest of it was it did so with alot of usless filler words and to top it all off all the other stuff it was said to explain was so stuffed full of missplaced comments it made the other code useless.
This is not for a beginner more like someone who already knows how to do this stuff that wants to sit around and try picking out peases of useable code from a pile of garbage.
Awesome tutorial i learned alot and even though this tutorial doesnt show you how to make potions i learned how to do it by myself when i finished this tutorial
Great tutorial, but i need some help
how can i make my npc's move by themselves, as
abosed to just sitting there
thanks
Hey man,
I followed your tutorial very easily. I subscribe to the practice of placing all of my script (or as much as possible) on a single layer in my main scene. This way it is easier for me to be organized. In order to do this, I just changed your onClipEvent handlers to onEnterFunction handlers and then substituted my instance names for your -root.whatevers. Everything worked great.
PS. I enjoyed the extemporaneous conversation. I will probably link to this for others to see!
Thanks
In case anyone couldn't figure it out, the enemy code without the fill is:
onClipEvent(enterFrame){
if(this.hitTest(_root.man)){
_root.hpBar -= (random(2)+1)}
}
}
Check that! This is it:
onClipEvent(enterFrame){
if(this.hitTest(_root.man)){
_root.hpBar -= (random(2)+1)}
}
Thanks, this tut helped alot :D
It's very handy for beginners, and nicely explained.
This is a very sexy game. Thanks! =D
tutorials good D: lots of writing but perfect for beginners thumbs up
Whenever I press enter, it brings me to the next frame. This tutorial helped me a lot and I continued adding things after it, but yeah, is there any way to prevent the press of "Enter" from bringing me to the next keyframe? Thank you.
source????????????????????????
awsome tutorial and beyond...
relly great helped a lot but i couldn't get the enemy and health bar to work :(.
the "unnecessary" text was quite fun.
what is a mc?!??@
@Anon- MC is a movieclip.
do you have video tutorial about the NPC?
I'm confused on that part